LinkedIn and cold email. For my money they’re two of the best ways to find freelance writing clients.
We’ve written in detail about prospecting for clients using LinkedIn and cold email previously on the blog. But as far as LinkedIn goes, it’s time for an update.
For some time now, LinkedIn have offered three plans that are suitable for freelancers: Free, Premium, and Sales Navigator.
I’ve always used a free account, but recently the commercial search limits have been lowered, there are fewer advanced search filters, and features such as notes and tagging that are useful for prospecting have been removed.
So, I decided to check out my options. After conducting some research online I discovered that a lot of the functionality of LinkedIn Premium has also been removed.
That’s right. LinkedIn are pushing for customers to opt for Sales Navigator – their top level plan. And since they offer a free 30-day trial, I decided to give it a whirl for a month to see if I liked it.
Long story short, I liked it a lot. LinkedIn Sales Navigator has some very powerful features including advanced search and filtering options to help supercharge your prospecting efforts.
Curious to find out how it works? In this post I’ll walk you through the basics of finding freelance writing clients using LinkedIn Sales Navigator.
Sign up for Your Free Trial
First, go to the Sales Navigator page to start your free 30-day trial. Near the top of the screen you’ll see a question: Which of the following best describes your LinkedIn membership status?
If you have a free account, go ahead and click the first link. Click the second link If you’d like to upgrade from LinkedIn Premium.

On the next screen, click on the start my free trial button. This will bring you to the Sales Navigator pricing page where you can start your free trial. You’ll need to enter your credit card details to sign up for the 30-day trial, but you won’t be charged if you cancel before the end of the trial period.
Set Your Sales Preferences
Next, you’ll be lead through a series of steps to set up your account. Sales Navigator is a completely different platform to LinkedIn, so you’ll need to save your sales preferences before you can start prospecting for clients.
The preferences you’ll be asked to set are:
- Geographies – select the geographical areas you’d like to target clients in (cities, states, countries, or regions), or click on the Don’t sell by geography? link at the bottom right of the screen to skip this step
- Industries – select the industries you’d like to target
- Company size – choose one or more of the options or click Any size
- Functions – select the functions of your prospects (what are their roles in the businesses you’d like to target?)
- Seniority level – choose from the options e.g. Director, VP, or Owner
Save Accounts
The next step is to save at least three accounts. These are companies you’d like to follow and receive updates from on your newsfeed. For this step, I recommend thinking of a few ideal clients in your niche – or just companies you’d really like to work for. Then, type the company name in the search bar and click Save account.
Once you start using Sales Navigator more frequently you’ll notice updates from these companies in your newsfeed. These are really useful as conversation starters in messages to prospects. You can also like, share, and comment on your prospect’s updates to engage with them.
Start Prospecting
The first thing you’ll notice on the Sales Navigator interface is your personalized newsfeed. There are also tons of useful functions located along the top bar.
*Pro tip – go to the top right of the screen, click on the grid icon, then click on LinkedIn Learning. It’s free with Sales Navigator and it’s full of useful video courses on a variety of topics. I recommend watching Learn LinkedIn Sales Navigator for a detailed overview of how to use the platform.


Right now though, I want to show you exactly how to use Sales Navigator to find your ideal prospects. Ready? Then let’s get started.
First, hover your mouse over Advanced in the right corner of the search box at the top of the screen and click on Search for leads from the dropdown menu.

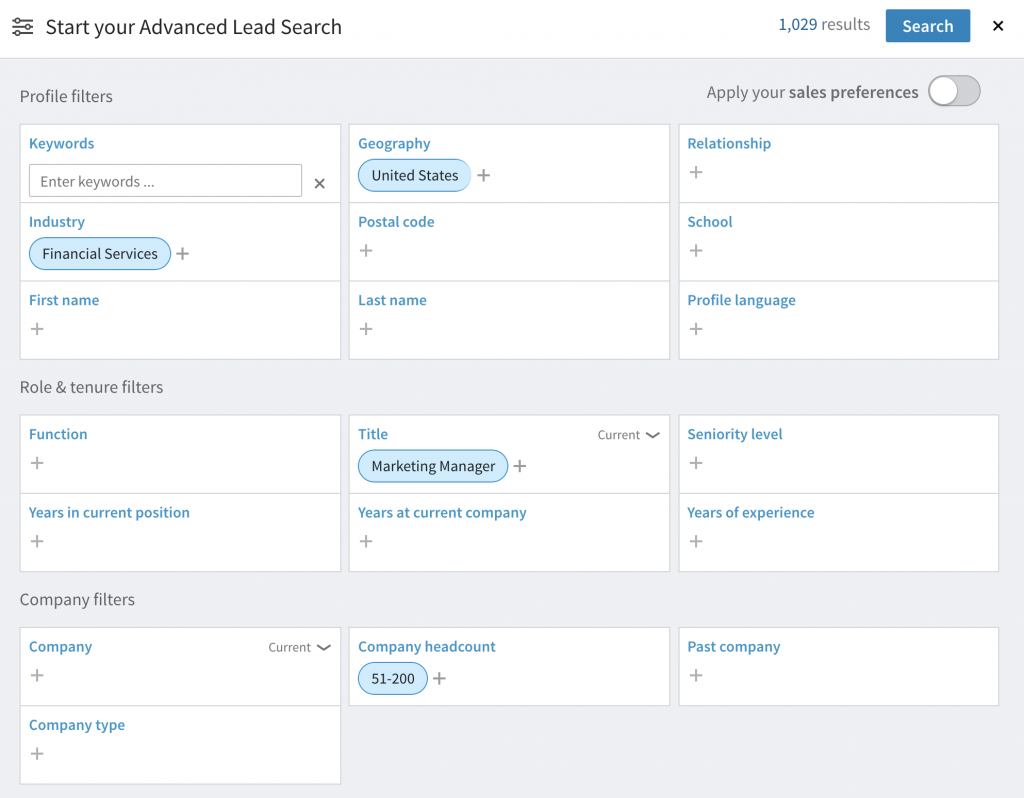
This will bring you a to screen that displays the Sales Navigator Advanced Lead Search options. From here, you can choose Apply your sales preferences in the top right hand corner to search for prospects based on the sales preferences you set earlier. If you prefer, you can start from scratch and set new parameters for your search.

As you can see from the screenshot above, there are over 20 search filters to choose from. Let’s take a look at the results of a very simple search based on 4 key variables: Geography, Industry, Title, and Company Headcount.
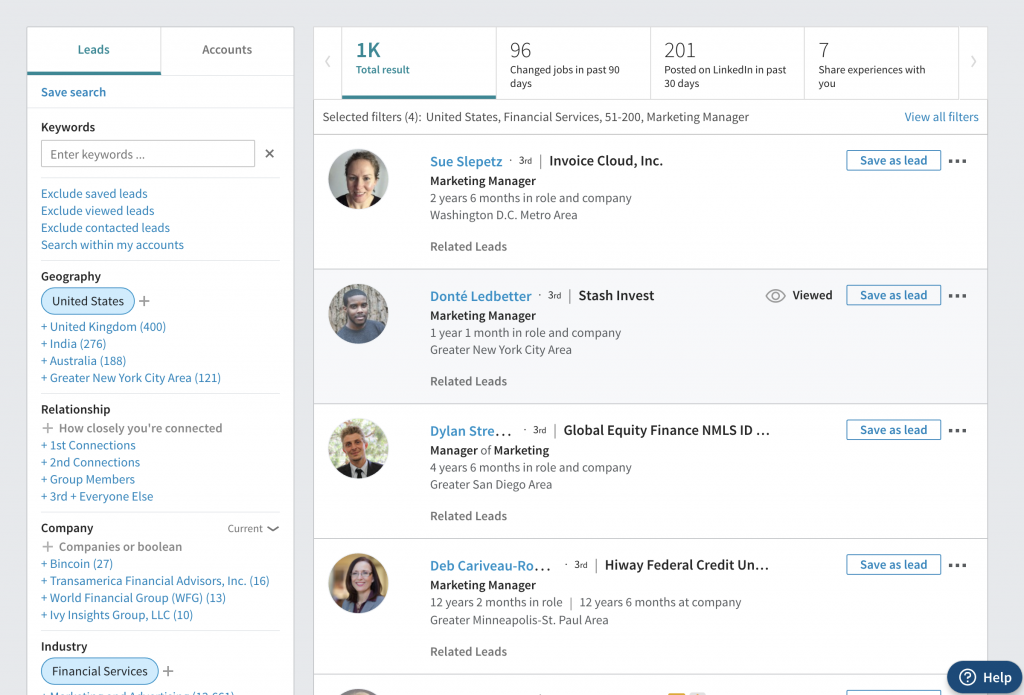
I’ve chosen United States, Financial Services, Marketing Manager, and 51-200 employees. These parameters are quite narrow – I could have added more options for each of these variables. But even so, there are 1,029 results for my search!

After clicking search, I now have a list of over 1,000 marketing managers in my chosen niche. And if I want to narrow or widen my results I can do so easily in the panel on the left.

Useful Search Filters
There are lots of great search filters to choose from and I recommend you experiment with them to find the most relevant results. Let’s take a look at a couple of my favourites.
Keywords
In the Keywords box on the left I’ve typed in “content marketing” OR content. This is called a Boolean search, and it helps me narrow down my results. Use quotation marks if you want to search for two separate words in a specific phrase – just as I’ve done with “content marketing”.
You can also use OR or AND (in capital letters) in a Boolean search. For my search, I’m looking for profiles that contain the phrase content marketing OR the word content. If I wanted to search for profiles that contain both, I’d type “content marketing” AND content.
Adding these keywords will narrow down my list of prospects to include only those with content marketing or content in their profiles. As you can see from my results, I now have a list of 263 prospects.

Changed jobs in past 90 days
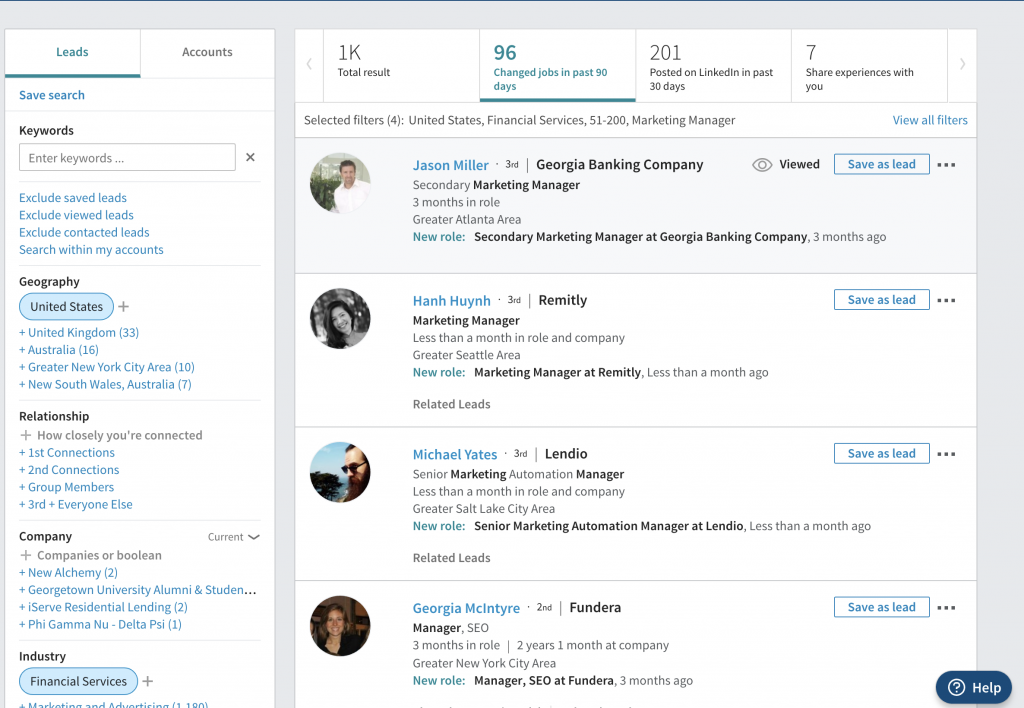
This filter is very powerful as it allows you to find prospects that have recently changed jobs. Why is this useful? Because people who’ve just started in a new role are often more open to hearing new ideas – and working with freelancers!
You’ll find this filter in the top bar of the search window. When I click on this option you can see that there are 96 people in my original list who’ve changed jobs in the past 90 days. This tells me that they would be the best prospects to contact first.

Connecting With Prospects
Now it’s time to connect with some prospects. To do this, I recommend using both LinkedIn and cold email.
First, I like to conduct some basic research to make sure the prospects in my search results are a good fit for my services. I do this by looking at their LinkedIn profile and/or company page to find out more about them.
I’ll also look for a link to a company website to get an overview of their business. This is not an exact science, but some quick research should give you a better idea of whether or not they produce a lot of content, and if you may be able to help them.
If you offer long-form blog posts do they have a blog? If you write case studies do they have case studies on their site? It’s always a good start to find a company that’s already producing the type of content you offer.
If they’re a 2nd degree connection and seem to be a good fit, I’ll send them a personalised invitation to connect. Here’s a template you can use to send a personalised connection request:
Hi <name>,
I noticed we share some connections here on LinkedIn and are both actively involved in the (niche e.g. Financial Services) industry.
It’s great to meet people within the industry, and I thought we could both benefit from connecting.
Thanks!
<your name> <your job title>
Next, I use tools like FindThat to find and verify prospects’ email addresses. All you need is the name of your prospect and their company website address.
This information is readily available on Sales Navigator. To find a company’s website address, simply click on the company name to the right of a prospect’s name and check out the company page. A link to the website is usually located in the top right corner.
When you have your prospect’s name and website address, copy and paste them into the search box on FindThat and let the app do the heavy lifting.
Don’t worry if you can’t find the email address of a particular prospect. Just move on to the next one. That’s the beauty of Sales Navigator – it’s VERY easy to find more prospects!
Wrapping Up
That’s it for today’s post. I hope you found it useful. If you’re struggling to find enough prospects and clients why not give LinkedIn Sales Navigator a go? It really is a hugely powerful tool that can have a big impact on your business.
I’ve only just scratched the surface when it comes to the full functionality of Sales Navigator, and I encourage you to give it a go and experiment with it yourself.
By the way, there are no affiliate links in this post. I just believe that Sales Navigator is an awesome tool that can help a lot of freelance writers. And did I mention it’s FREE to try for the first 30 days?
Do you want FREE resources to help you write better, earn more and build a profitable writing business?
Then head on over to our "Free Stuff" Page


I’m using my 30-day free trial but within about 5 hrs of working with Sales Navigator, I’d already collected enough leads that I feel I won’t want to let my subscription lapse. Now I’ve figured out how to search more effectively (thanks to your clues above) and I’ve found about 4,000 more leads just this morning.
It’s frustrating that LinkedIn charges so much for this, though. But if you’re thinking “time is money,” it’s going to be worth it, I believe.
I think the feed is one of the most beneficial aspects. It cuts LI literally “down to the chase” and allows you to focus on interacting with leads.
Search abilities and the focused feed are HUGE for me. And since my clients (legal vendors) can get their clients through LI more so than any other social media platform, I’ll recommend Sales Navigator to them, too.
I agree, Leah. I’ve kept the subscription beyond the month. It is a bit pricey but it’s already paying for itself. And yes, the feed is really useful. I could write a whole other post just about that! LinkedIn have really created a great product with Sales Navigator – it saves a huge amount of time.
Richard, this is one of the most useful blog posts I’ve read in years. And so well written!
I’m studying Sales Navigator myself and am excited by what I see. In a way, it offers “trigger events” and we know how powerful those are.
In fact, your reference to identifying prospects who have switched jobs is a trigger event, and your tactic to contact them at that juncture is brilliant.
Bravo! Thank you for such a helpful post!
Thanks Chris! LinkedIn have really done a great job with Sales Navigator. I think the advanced search filters and trigger events are the most powerful features for copywriters.
Hello Richard, I am professor Joseph. I lead a team of ten professional writers. I depend on bidding work from content mills only. They pay a very little amount of money for huge amount of work. How can be of service to you? Do you know anybody who can help me fetch direct clients to work with? you can consider me a resource if you have any freelancing work.
reach me through cinderellafreelance@gmail.com. Thank you