

Let me guess…
You want to learn how to write a blog post.
But not just any old blog post.
A post with personality. A post with flow. A post that engages readers so that they read the entire thing and can’t help but share it.
More importantly, a post that drives traffic and converts. One your clients will love and be happy to pay a pretty penny for.
How do you write such a post?
It’s simple. But, you need to put in the effort and follow the basic structure of any great blog post. You need to choose a topic, a catchy headline, follow a writing process, spice up your writing and add value.
Real value.
You need case studies.
You need examples.
And you need plenty of them. Not one. Not two. But three, four, or more.
Also, you need to learn how to optimise these posts for search engines.
I’ll show you how I do it with this very post, using WordPress and Yoast. If you can master SEO, you’ll have a value-added service that you can offer your clients, and they’ll love you for it!
A word of caution, optimising blog posts for search engines isn’t a magic bullet. It doesn’t guarantee rankings in search engines; there are so many other ranking signals to consider.
In fact, Brian Dean has listed over 200 Google ranking factors that play a role. Reference those if your client ever says, “But we aren’t ranking”.
Before I show you how to write a great post your clients will love, let’s analyse the underlying structure of any blog post.
The Structure of a Blog Post
Any blog post should follow a basic format. It serves as the foundation, and I will reference it throughout the post. It should have:
- A catchy headline and image to encourage clicks.
- A hook so readers keep reading.
- The body with your copy, headings, subheadings, bullet points, short paragraphs and links.
- A conclusion that sums up the key points of the post.
- A call to action. You want readers to take action, right?
Now, down to the meat of it.
How to Write a Great Post: The Process
Here are 8 steps to follow:
- Decide on a Blog Post Topic
- Create a Catchy Headline
- Plan (Research and Outline)
- Write Without Distractions
- Check Flow and Editing
- Polish for Perfection
- How to Bring Life To Your Copy
- Optimise Your Post to Get Results For Clients
Step 1: Decide on a Blog Post Topic
Unless clients give you a list of topic ideas, they’ll expect you to come up with ideas.
How exactly do you do this?
Here are 5 ways:
#1 Understand What Type of Content They Publish
Seems logical right? But far too many people do tons of research, pitch an idea, and the client responds: “It’s not what we’re looking for”.
So, before you start barking up the wrong tree, understand their business and their content. If it’s a new client, send them a questionnaire to learn more about their business.
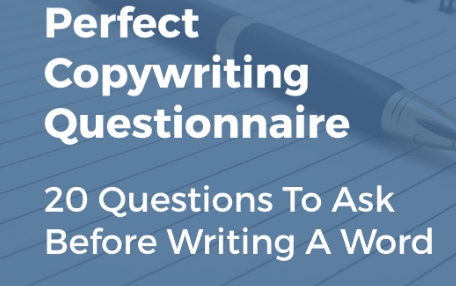
There are many questions you can ask. Jacob McMillen shares a copywriting questionnaire with 20 questions to ask before putting pen to paper.
If 20 is too much, consider asking at least four important questions:
- Who is your target audience?
- Who are your competitors?
- Could you give me links to examples of the type of content you’re looking for?
- What are the primary challenges your customers are facing?
Answers to the above questions will kickstart your search for ideas. For example, if you know your client’s competitors, you can visit those sites, see what content they’re publishing, and develop ideas.
#2 Ask Customers What Their Current Focus is
You can also ask your clients. What? Just ask? Yes. In the world of the internet, many people forget that two-way communication exists; you can often solve problems by simply asking.
If your client asks you to send over article ideas, ask them if there are any relevant topics they want to cover right now. The responses they send will surprise you.
This recently happened to me. After writing for a client for over a month, I sent them an email, asking if there was anything that I could improve. I recommend this for any writer as it helps build a relationship. Here’s that email: 
While I didn’t explicitly ask for new topics, after a short email exchange, the client responded with five tops.
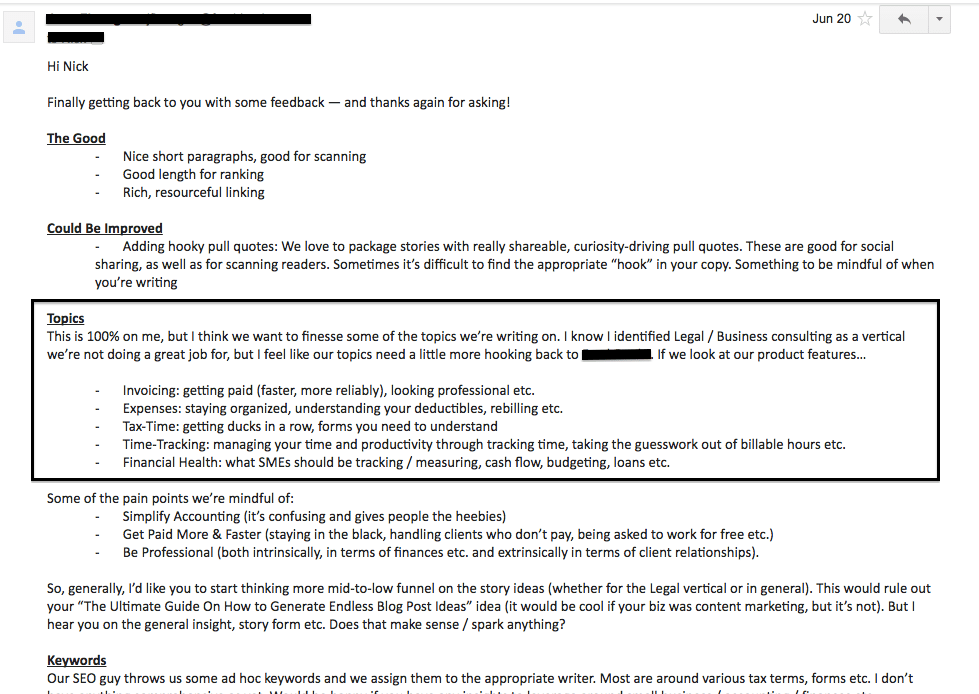
It’s proof that clients are willing to share this information, if only you ask. I now had direction and used Google and Tweak Your Biz Generator which is a title generator.
I entered a topic, specified if it’s a noun or verb, and Tweak Your Biz gave me hundreds of potential blog post titles organised into different categories.

Categories like lists; questions; how to; celebrities; business; motivation; and Ing. Be careful with that last one; depending on how you entered your words, the grammar may not be correct.
Regardless, within a few hours, I had generated 6 article ideas, several of which the client liked. I’ll share a few other title generators later in the article to help when crafting headlines.
#3 Use Quora
Any great blog post achieves one thing: it solves a customer problem. Or, it answers a pressing question someone has.
Quora is a great platform for finding common questions people ask about specific topics. It’s a social network where people ask and answer questions.
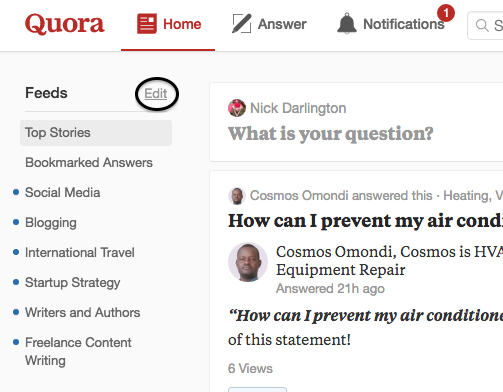
Sign-up to their platform, choose what topics you want to follow, click on those topics and look at all the questions people are asking.
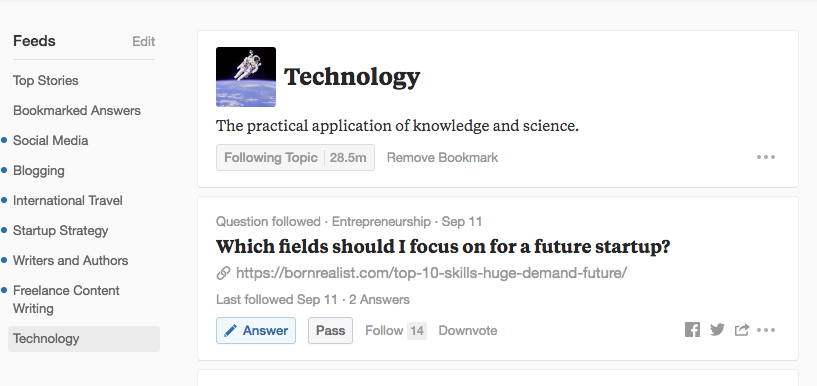
Let’s say you’re writing a blog post for a technology client. Under the “Home” tab, next to “Feeds”, click “Edit”.
In the “Search” tab type in and select “technology”. It’s now in your “Feeds” tab.
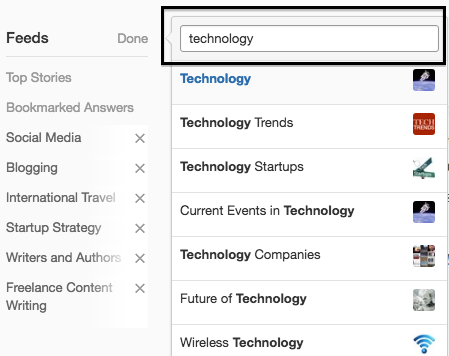
Click on the topic and scroll down to view all the questions for that topic.
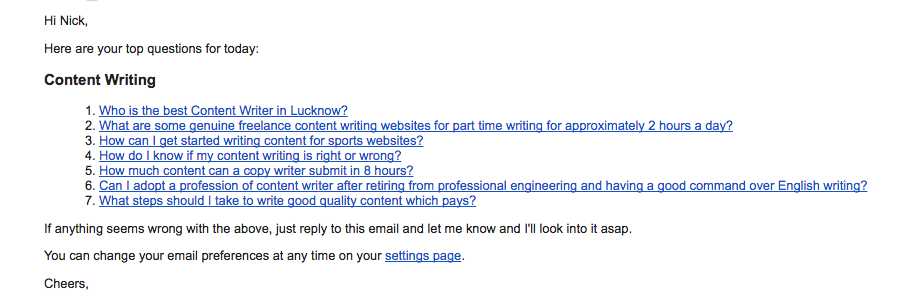
I also recently discovered IdeaStream – a tool that aggregates questions for any topic on Quora.

Sign-up, enter your topic, and you’ll receive daily questions in your inbox. Here’s what I received today for “content writing”.
Why not give it a try?
The basic plan is free for access to one topic and 10 question sent daily. The pro plan is $5/month for access to 5 topics. It also gives you the ability to set the number of questions per email and choose the days when you receive those questions.
#4 Analyze Blog and Facebook Comments
Keep your eye on questions people ask in Facebook groups and on blog posts. The other day I received the following comment on a post I wrote on WriteWorldwide about how to get more freelance writing clients:
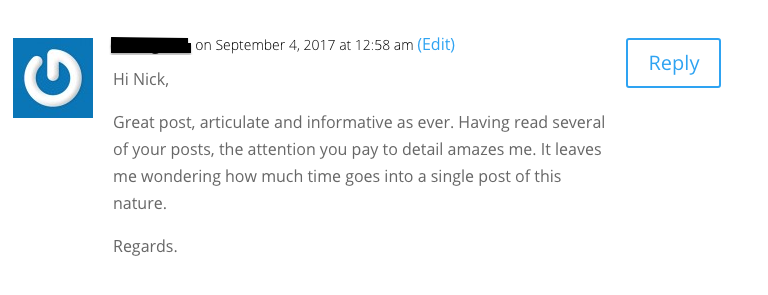
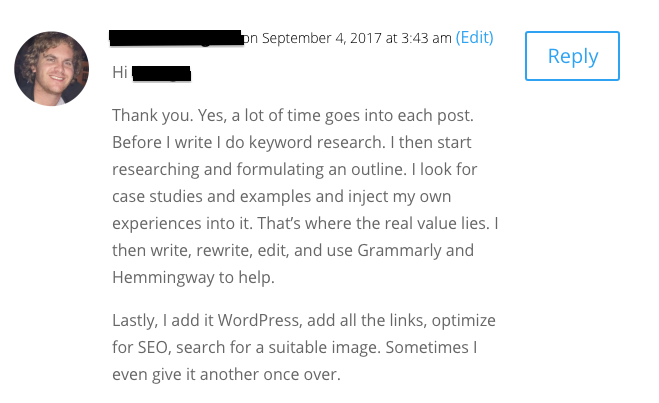
He was wondering how long it took me to write a blog post. I responded breaking down the process for the person in my comment.
By the end of it, I thought: What if I write a blog post that shows readers how to write one? Then a few days later I stumbled across this post in a Facebook group:

The person was saying that he feels his writing was too dry and was asking how he could inject life into it. That gave me even more inspiration for a post.
And then finally, I came across advice that changed my outlook on blogging for ever. During an interview with Jacob McMillen he said something, which to be honest, I already knew, but for some reason I needed to hear it from a top copywriter.
He mentioned what the difference was between earning a few hundred dollars and a few thousand dollars for an article. Case studies and examples!
All three comments were the inspiration for this post.
#5 Do Keyword Research
Keyword research allows you to kill two birds with one stone. You can use it to generate topic ideas and also decide what keyword (s) you want to rank for. I’ll show you how it works with Google’s Keyword Planner tool:
Step 1: Sign up for an AdWords account.

Step 2: Create an ad and pause it. Google requires that you follow this step.
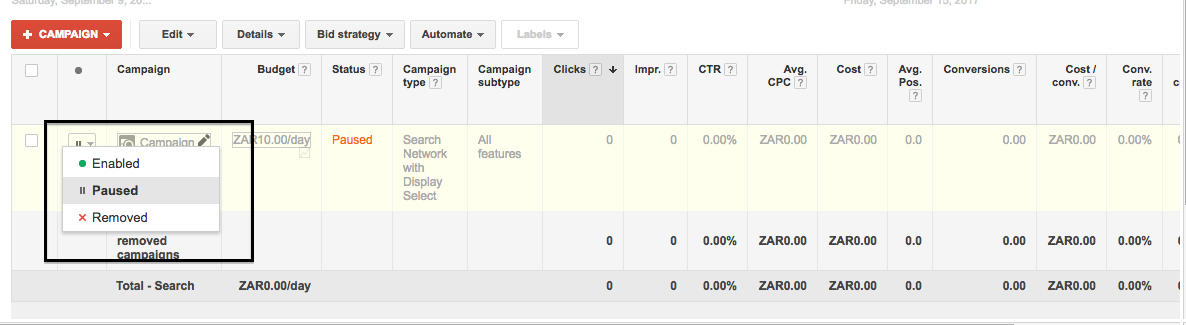
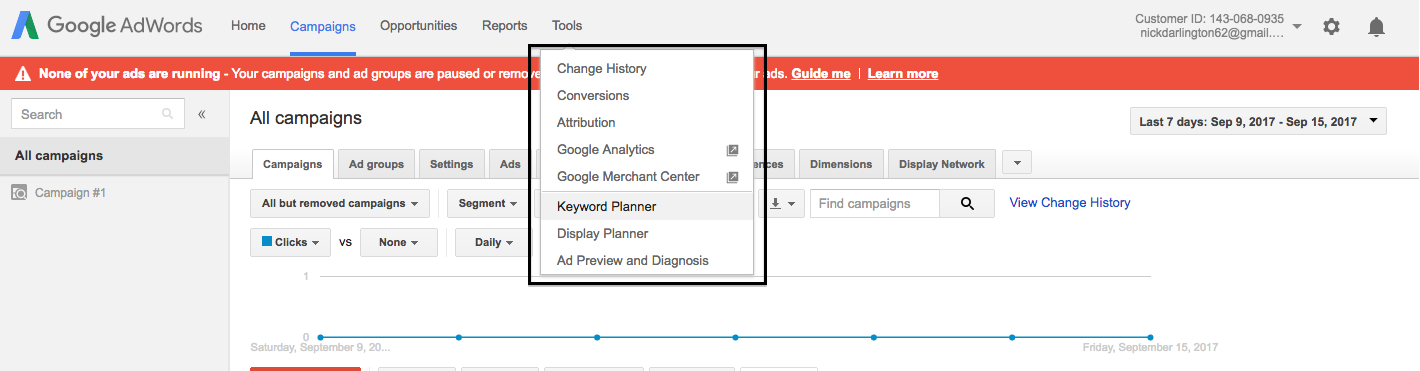
Step 3: Access the Keyword Planner
Step 4: Type in a topic such as “small business”, “invoicing”, “freelance writing”, “blogging” and so on. In the below example, I used “small business.”
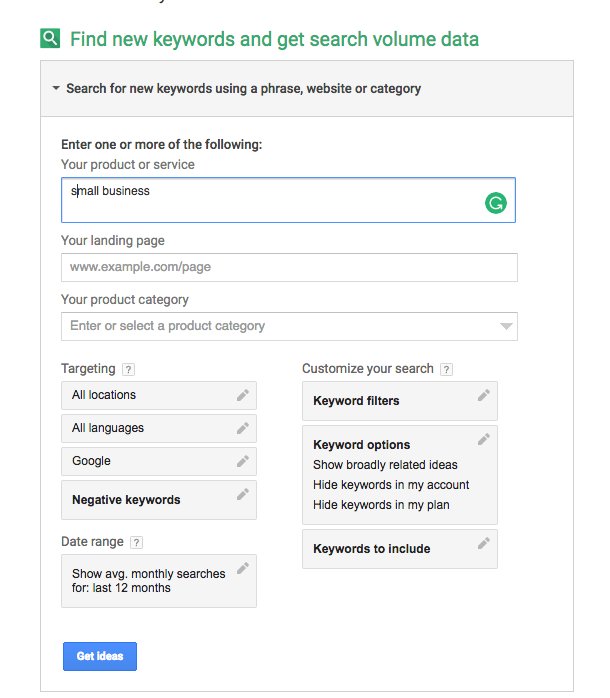
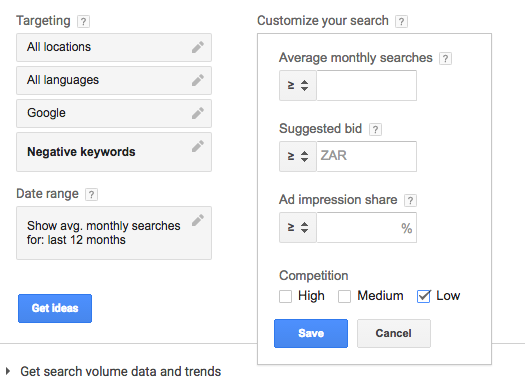
Step 5: Apply any filters. For example targeting “low competition” keywords is a good option; it’s easier to rank for these keywords.
Step 6: Click “Get Ideas” and start searching.
Find those gems: long tail keywords with high search volumes and low competiton. Long tail keywords are keywords that are three to four words in length and specific to what browsers are searching for.
In my example, “small business administration” and “unique business ideas” are solid keywords to rank for. See? Low competition and high search volumes.
![]()
From that, I can generate several blog ideas like:
- 10 Unique Business Ideas to Start an Online Business
- What is the Small Business Administration?
Whether you decide to use the Keyword Planner to find topic ideas is up to you. However, you should do keyword research before you write a post to decide what keyword you want to rank for. You want readers to find your clients’ content in search engines, right?
Follow the same process I listed above. It’s the process I used to decide on my keyword for this blog post: “how to write a blog post”. Search volumes are healthy, and the competition is low. See?

Bonus Tip: Find LSI Keywords (Latent Semantic Keywords). These are synonyms and keywords that are semantically related to the primary keyword. I won’t go into much detail here, but I will tell you that Google considers your post more relevant if you use LSI keywords.
In the end, their goal is to match the right content with what users want, and these words help achieve that.
The one tool I recommend to get started is to use the LSI Graph. You enter your primary keyword in the search bar and hit enter. Let’s see how it works by using “how to write a blog post”.
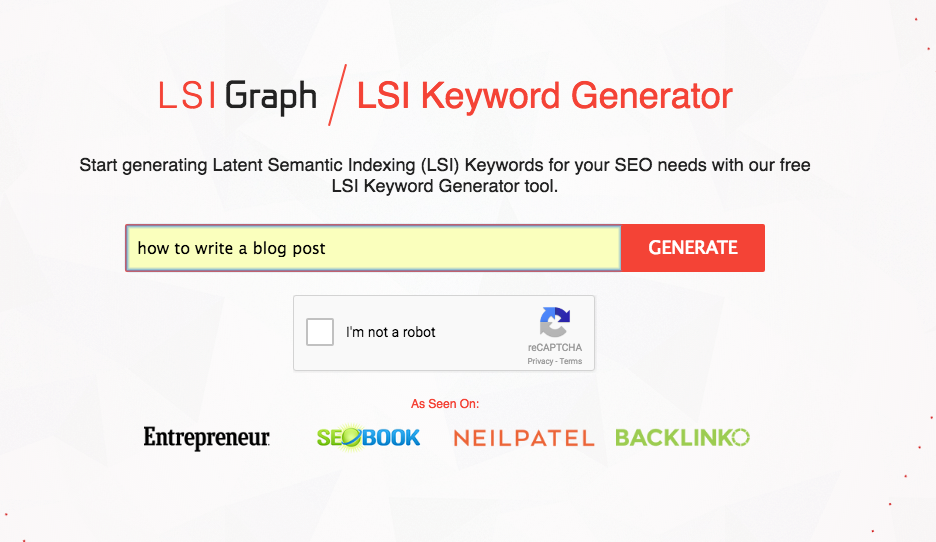
The tool spits out a bunch of words, such as “blog post outline”, “tips for writing a blog”, “blogging for writers”, “do bloggers get paid” and many others. Sprinkle these naturally into your article.
Once you have a topic idea and a keyword you need to make sure your post gets noticed right off the bat.
Step 2: Create a Catchy Headline
Before I get started, take note that the idea is to build a workable headline and include your keyword. You can always tweak your headline after you’ve written your blog post. Okay now back to what I was saying about getting readers attention.
You have 2.6 seconds to grab readers’ attention according to Shane Melaugh of Thrive Themes. Great content is nothing if no one clicks on it because the headline is weak.
And to show you how powerful headlines are, consider Erin Falconer’s case study on Pick the Brain. Erin wrote an excellent post – The Two Types of Cognition.
She knew it was good because the average reading time was 6 min. But, there was one problem: it only had 100 views.
With a headline change to “Learn to Understand Your Own Intelligence” the post view skyrocketed to 4930.
But how exactly do you create these great titles?
Steal. That is, use ideas of others who have been doing this a lot longer than you. That doesn’t mean to copy and paste a headline. It means learn from the best, see what they’re doing, and apply those methods.
We’ll look at three awesome resources including headline analysers and headline generators. But before we begin, make sure you download 52 Headline Hacks, created by the owner of Smart Blogger – Jon Morrow.

It’s a “Cheat Sheet for Writing Blog Posts That Go Viral”.
Save it to your desktop and keep it handy for easy reference. Jon covers the classic “how-to” headlines, “list-post” headlines, and providers“ Bonus Headline Hacks”. I enjoyed how he explains the different variations of “how-to” headlines. For example, you can have:
- How to in its simplest form, e.g. How to Write a Blog Post
- How to be (desirable quality) e.g. How to be Exceptional
- How to (Blank) Without (Objectionable action), e.g. How to Run Faster Without Getting Tired
- How to (blank) and (blank). Insert two benefits. For example, How to write a Blog post That Gets More Shares and Traffic.
Here are examples from WriteWorldwide that follow the “how to” and list post templates:
“How to” Headlines:
- How to Bulletproof Your LinkedIn Marketing Presence as a Freelance Writer: Part 1
- How I Landed a $6250 Freelance Writing Gig (As a Beginner)
- How to Find Profitable Freelance Writing Niches (Plus 5 Examples)
List Post Headlines:
- 3 Pitching Templates That Will Help You Land High-Paying Freelance Writing Gigs
- 30 Travel Magazines that Pay Freelance Writers up to $3 Per Word
- 9 Killer Ways to Generate a Constant Stream of Blog Post Ideas
Now onto headline generators.
Headline Generators
I did mention Tweak Your Biz Generator but there are others such as:
Let’s see how Hubspot’s Topic Generator Works. Start by selecting three nouns. I chose “blogging”, “writing”, and “freelance blogger”. Click “Give me Blog Ideas”.

The tool gave me 5 blog ideas – that’s a week’s worth of ideas.
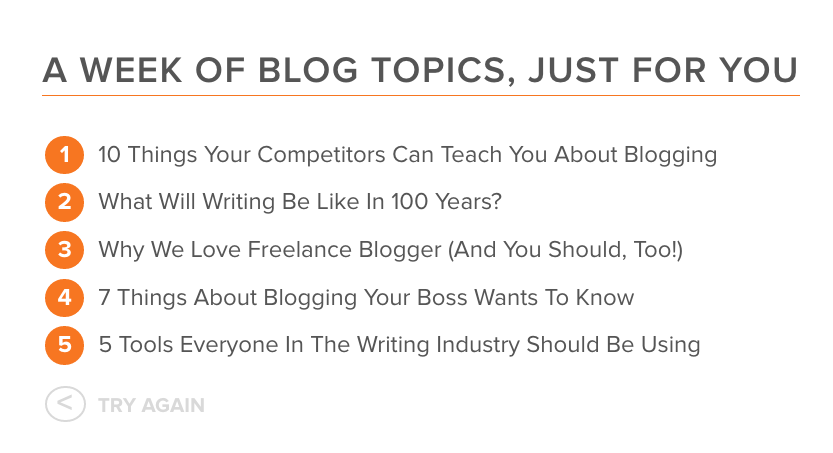
Obviously, the tool isn’t perfect, so “try again” until you’re happy.
Headline Analyzers
Once you have a headline you’re happy with, see how well it holds up with the CoSchedule Headline Analyzer.
The beauty of CoSchedule is that it gives you feedback on how to rewrite your headlines. And, each time you do, your old ones stay in the drop-down with their scores so that you can compare.
CoSchedule deals with:
- The length of your headline
- Wordiness
- What percentage of emotional words there are
- Common, uncommon and power words
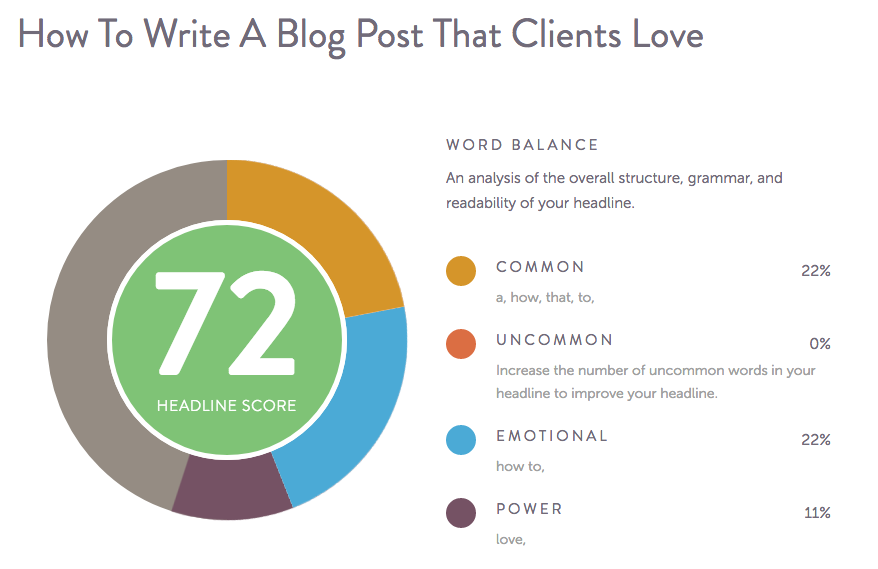
It explains the proportions to use these in to create a great headline! I’ll show you how I used it to improve my headline for this post. My first title was “How to Write a Blog Post”. Here’s my score:

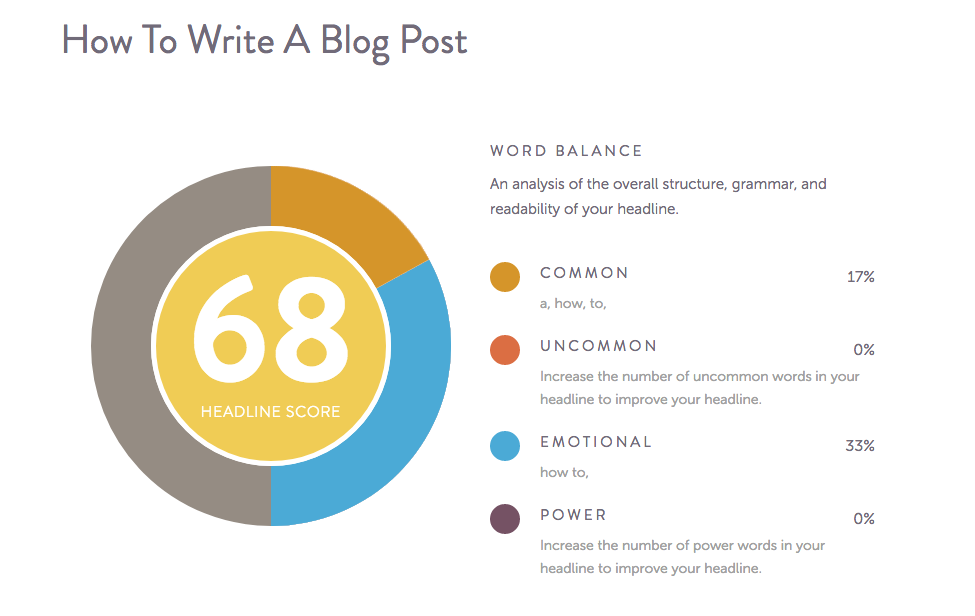
Based on the advice I saw I needed to improve the number of common and uncommon words. I changed it to “How to Write a Blog Post That Clients Love”. My score instantly went up to 72; it’s now in the green:
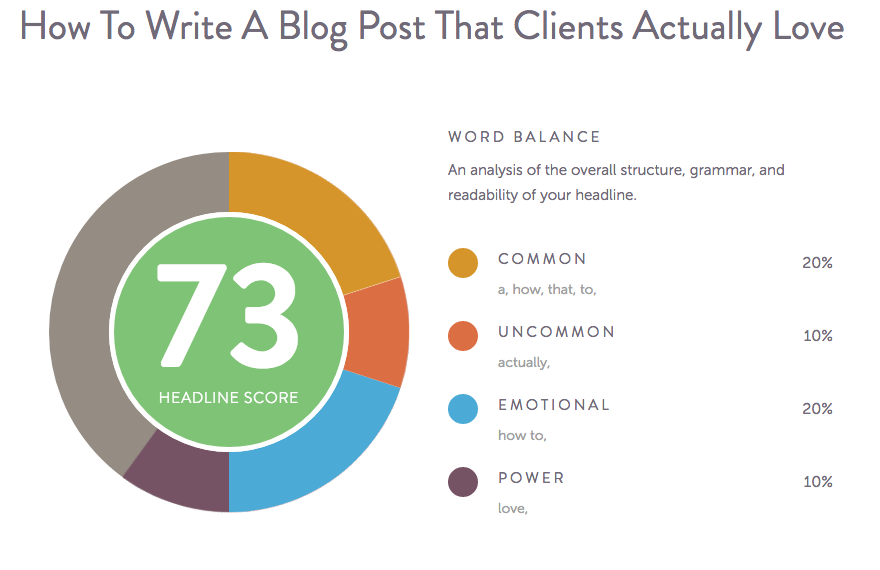
I’m happy, but not yet satisfied. I decided to aim higher and introduce an uncommon word. I changed my title to “How to Write a Blog Post That Clients Actually Love”. It moves up to 73.
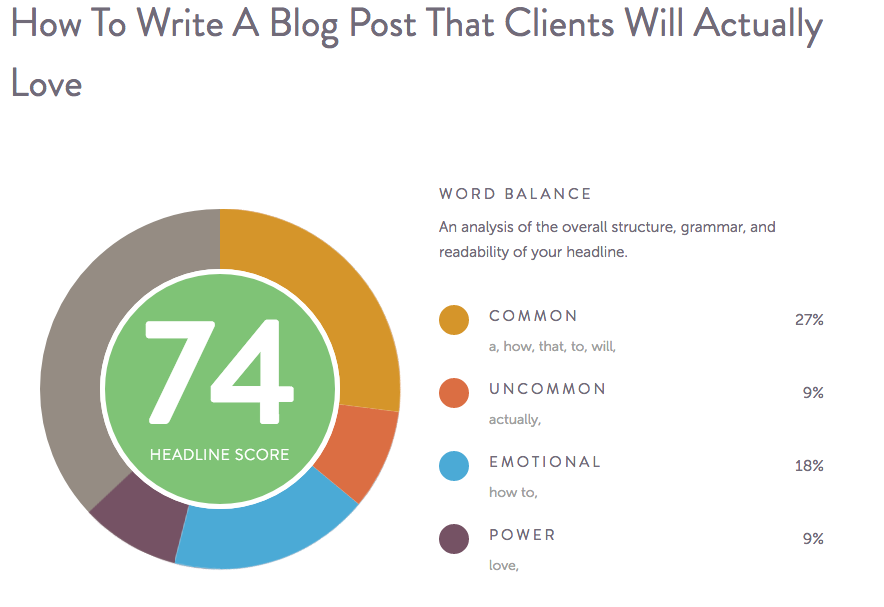
But, I’m still not happy and change it to “How to Write a Blog Post That Clients Will Actually Love”. It ends up on 74.
Beyond Co-Schedule Headline Analyzer, another free alternative is the Advanced Marketing Institute.
Let’s recap.
I’ve shown you how to come up with blog post ideas, do keyword research, and how to create killer headlines. The next step is to plan your post.
Step 3: Plan Your Blog Post
I usually start with a one-liner explaining the purpose of the post. For example, the goal of this post was to show you how to write a blog post that your writing clients will love. One that is well written, with personality and flow, includes real value and is optimised for search engines.
If you know something about the topic, word vomit and write all you know. Get it down on paper. Sometimes we go on tangents, spending long periods researching when we actually know more than we think. So, form a blog post outline with what you know, including headings and subheadings.
Let’s assume you don’t know much about the topic, then, you’ll have to do research. Type keywords into Google and find articles that relate to the topic. Jot down, subheadings and include key-points; the structure will fall into place.
If research annoys you, compile a rough outline and find a ghost drafter to do the heavy lifting for you. They can find the case studies, examples, and links that take time to find and will add real value to your post. On the note, let’s talk about what real value entails.
Add True Value
You’ll notice that throughout this post I didn’t just tell you to do something; I showed you how to do something. For example, I showed you how to do keyword research and included screenshots.
I showed you how to use the headline analyser and added screenshots. I showed you how to create killer headlines.
Similarly, I included valuable links to other resources such as the Headline Hacks Cheat Sheet. I also included examples of different types of articles that use the various headline formats.
These are a few examples of the kind of value I’m talking about. If you want other great examples of articles that do this, here are 5 (they all have great titles too):
- How to Come up With 93 Blog Post Ideas in 10 Minutes by Neil Patel
- The Cold Pitch That Made me $5025 (Or How to Craft an Irresistible Cold Pitch) by Bamidele Onibalusi
- The No Risk Pitching Method I Used to Land My First $5k Writing Gig by Jacob McMillen
- How I made $3558 In My First Month As a Full-Time Freelance Writer by Richard Rowlands
- How to Get Traffic To Your Blog (How I Became the Freddy Krueger of Blogging) by Danny Iny
Okay by now you have your outline, with examples and case studies. It’s time to start writing.
Step 4: Write Without Distractions
Before I start talking about writing I want to give you a quick note on whether you should write introductions before or after you’ve written the body.
Writing an introduction at the beginning can be difficult. How can you know what to write if you haven’t even written the article? I get it.
But I prefer to write a rough intro first. Why? It gives my blog post direction, and it’s exactly what I did for this post. Whatever you decide, the next step is to start writing
Getting yourself to write can be hard. There are a million other things you could do, right? Browse Facebook, make a cup of tea, or even go for a walk in the garden.
Even when you do get down to writing, focusing can be hard. You fight the urge to edit as you write and sometimes do extra research because you realise that you don’t know enough about the topic.
How do you counteract this? Firstly, you must prepare. Make sure your research and outline are comprehensive.
Secondly, use a Pomodoro Timer to help you concentrate. You can grab a Chrome extension online.
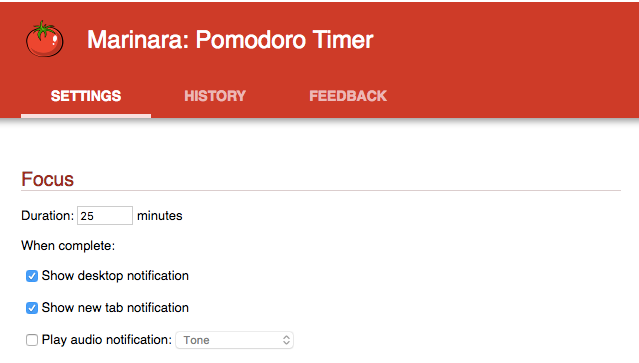
Set the timer – 25 min is the norm, but the great copywriter Eugene Schwartz set it to 33.33 min. The principle is that time you can only engage with your outline and write.
When you’re done, take a five-minute break. That break is necessary because it lets your brain be creative.
How often have you thought of creative ideas while brushing your teeth, taking a shower, or doing a random task? Often right? That’s the power of it. It’s no wonder Eugene Schwartz was such an advocate of it.
Thirdly, resist the urge to edit while you write. If you see a red line under a word, ignore it. Just keep writing to maintain flow. If you’re someone who can’t resist the urge to go back and edit, get rid of that distraction by using NotePad.
Walter Akolo, the owner of FreelancerKenya, uses this method. It not only helps him write faster because he doesn’t have the urge to edit, but it also helps him practice writing without making any mistakes.
I tried this technique over the past couple of days. I wrote 5000 words in 5 hours – with a solid flow throughout. Was it grammatically perfect? No. But it allowed me to finish the entire article – including drafts, rewrites and edits – in record time. So, why not give it a go?
If you’re still feeling distracted – use online tools like ZenPen. ZenPen provides a distraction-free environment for your writing.
You’ll notice that I haven’t mentioned “keywords.” Why? Because your top priority is writing for people. Sure, you need some keywords to let Google know what your content is about, but you should include them naturally, including your LSI keywords.
Also, don’t worry about your keyword density. Research suggests there is no optimal “keyword” density percentage and it’s confirmed by most SEO professionals. But there are some good guidelines to follow: add it in the title, meta description, and alt tags of your images. I discuss that later.
Regardless once your first draft is complete it’s time to let it breathe before checking for flow and editing.
Step 5: Check for Flow And Edit
You want your article to flow like a stream. The best way to check flow is to read it out loud. If you’re struggling with the flow, don’t worry, I cover it in detail later.
Once you’ve done that, edit, and edit ruthlessly. Cut unnecessary words and catch any typos. Two online writing tools I use – that will help – are Grammarly and Hemmingway Editor.
Want to see them in action? Let’s explore.
#1 Hemmingway
Go to the Hemingwayapp.com and paste your text in the free editor.
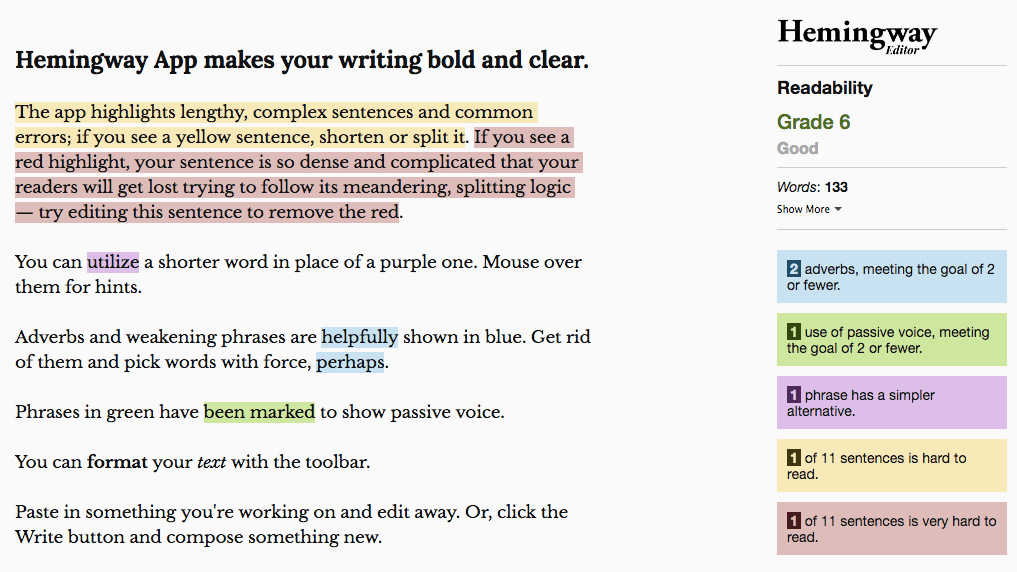
Here’s what the writing tool does:
- It analyses the complexity of your sentences. Red means sentences are very hard to read and orange hard to read. You want to reduce the number of these sentences in your post.
- It identifies passive voice in your writing. It provides a recommended amount that’s acceptable. But, I always aim for zero passive voice. Passive voice only weakens your writing.
- It identifies adverbs. Again, they add nothing; remove them.
- It highlights simpler alternatives for a word. For example, instead of “additionally” you could write “extra”.
The goal is to aim for a writing grade of 6. The lower, the better, particularly for online writing. I usually use Hemingway first, before running my text through Grammarly.
#2 Grammarly
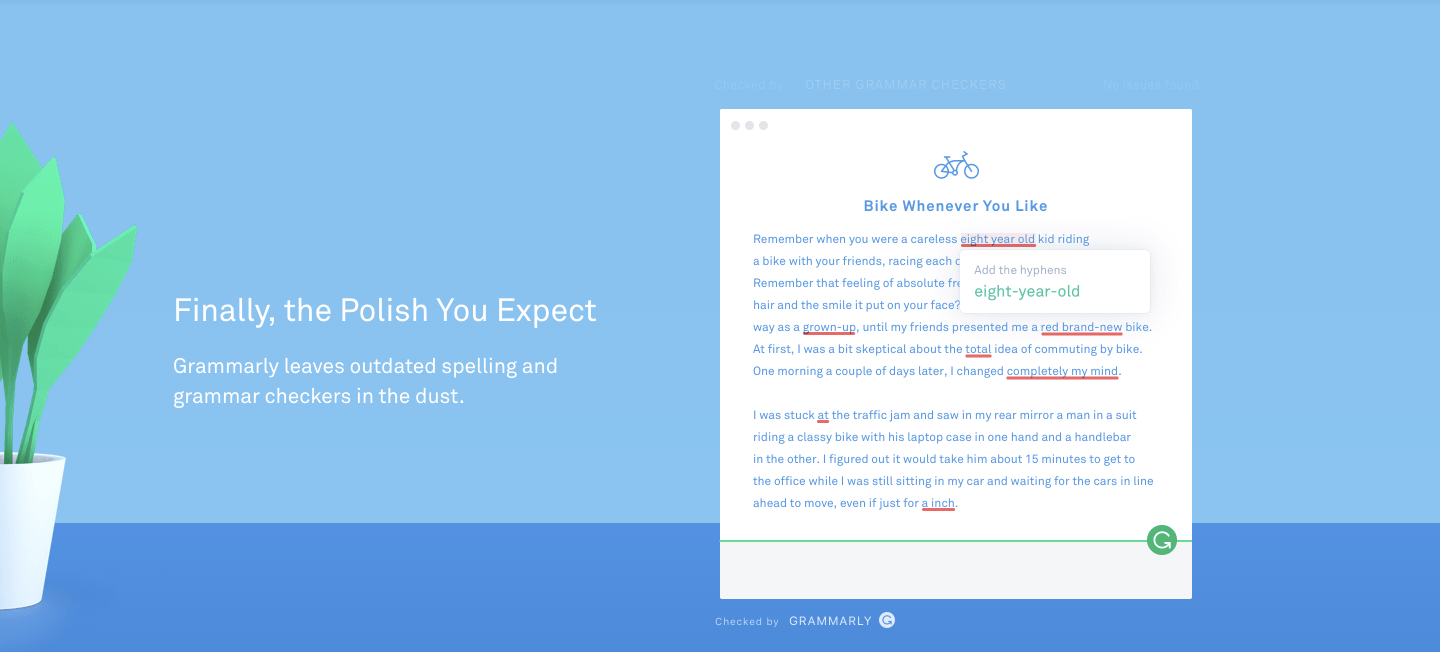
Grammarly has a free and premium version. The free version offers a basic spell checker and integrates with Chrome and WordPress.The premium version – which I use – provides more advanced features.
It identifies passive voice, dangling modifiers, and fixes punctuation. Beyond that, it also doubles up as a plagiarism checker.
Step 6: Make Final Polishes
The final touch-ups can be the difference between a good or great blog post. Here are tips to polish your post:
- Use shorter paragraphs. Online readers are scanners. You’ll see how I’ve broken up my paragraphs; they’re usually 2-3 sentences.
- Include internal links to other articles on your client’s blog. This reduces the bounce rate and directs readers to other content. This is good SEO practice.
- Include external links to other blogs to support claims and establish credibility. Again, this is good SEO practice
- Add a high-quality feature image that grabs readers’ attention. Use Pixabay, Unsplash, and Pexels to find images.
- Include a call-to-action. Every post should encourage action. Ask a question, provide a free downloadable in exchange for an email, or get them to sign-up for a trial of the product.
- Rework your headline, if it needs re-working.
If after polishing you feel your copy still lacks flow and personality, then you need to bring it to life.
Step 7: Bring Your Copy to Life
Here are some tips:
Lead With a Powerful Hook
Getting the headline right is important, but if your first sentence doesn’t entice readers, it’s all for nothing. It doesn’t matter how good your title is.
Enter the hook.
It’s so important, that beginner writing courses have been teaching about it for aeons. There are charts, posters and classes on how to do write hooks.
Here are ways you can hook your readers:
#1 Ask Questions That Address Pain Points.
For example, for this post, I could’ve asked a question that read: Do you want to become a freelance blogger, but aren’t sure how to write a blog post?
Or, do you know how to write a blog post with perfect grammar and punctuation, but struggle with style, personality and flow?
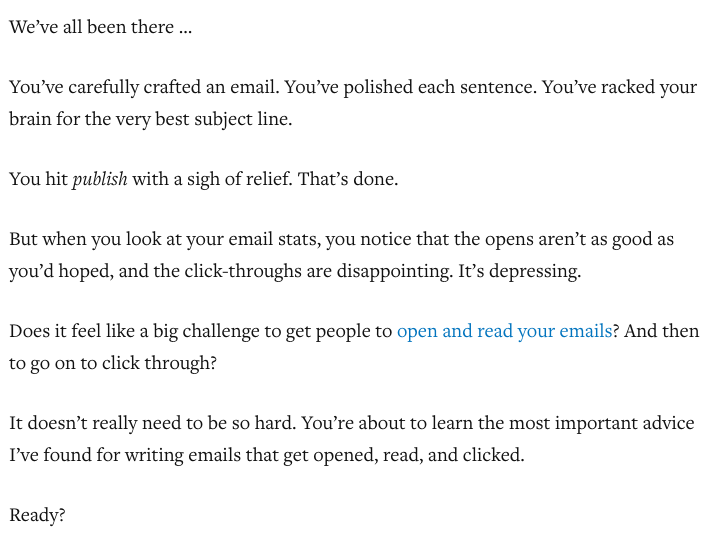
I pay a lot of attention to Henneke Duistermaat’s articles. She breaks things down succinctly and makes her process easy to follow. She wrote an article for Copyblogger a few years ago that provides a 3-step process for captivating your audience with a few simple lines. It remains relevant today. Here’s the process:
- Empathize with your readers. Ask a question, but make sure you understand their pain points.
- Promise a benefit they’ll get by reading the post.
- Reassure readers that solving their problems isn’t difficult.
A perfect example of a hook that follows this format is a post that Henneke wrote for CopyBlogger titled 37 for Writing Emails That Get Opened, Read and Clicked. See below:
#2 Use Bucket Brigades
These are words and phrases that keep readers glued to your page and reduce bounce rates.
It’s a classic copywriting technique that direct copywriters use to write sales letter, and it’s a technique employed by Brian Dean from Backlinko.
In fact, it’s a technique I used as the hook for this article.
Remember this opening one-liner?

That’s a Bucket Brigade.
Improve Flow
What is this magic called “flow” in writing? Flow is something that moves naturally and effortlessly. It’s something you are happy to go along with.
Is there any way to learn it? Are there some tricks you can pick up from those who do it well?
You can learn this elusive quality. Here’s a few ways
#1 Use Transitional Words
Some words help you transition from one idea to the next, sentence to sentence and paragraph to paragraph. These are transition words and phrases. Use them in your copy
Let’s look at examples.
Transitional words to join sentences:
- And
- But
- So
- Because
- Rather
- In contrast
Transitional questions/phrases that lead into new sections:
- Ready to get started?
- Let’s jump in
- Sound good?
Transitional phrases that join paragraphs:
- Not only that
- More importantly
- Even worse
- Let me explain
- Beyond that
Henneke Duistermaat from Enchanted Marketing wrote an article Distracted Readers? Use these 6 Transition Tricks for a Smooth Reading Experience. She discusses word connectors, pronouns and the “Industrial Strength Lubricant.
But transitional phrases on their own aren’t enough.
#2 Guide Readers From the Familiar to The Complex
“The real secret to flow is about guiding readers from what they already know to where you want to go,” says David Lipscombe in a Youtube Video.
He shares an excellent example. Imagine you’re reading an article about allergies, which you know nothing about, and you read this:

For those on mobile, it reads: “An Immunological overreaction in susceptible people is provoked when certain immune system cells, just beneath the lining of the nose or eyes, are bumped into by Pollen”.
Rather confusing don’t you think? I know I had to think carefully about what I was reading. Your readers won’t be that forgiving.
But with a simple tweak to the sentence David shows us how to guide the reader from the familiar to the complex:

For those on mobile, it reads: “When pollen bumps into certain immune system cells just beneath the lining of the nose or eyes it provokes immunological overreaction in susceptible people”.
Much better right?
Note: award-winning writer, Steven Hall, wrote this last sentence.
#3 Vary Sentence Length
Read this:
If you never vary your sentences, they become monotonous. When they became monotonous, they become boring. When they become boring, you lose your reader. They now leave. You’ve lost them forever. They will never return. Your bounce rates will be bad. Google won’t like you. This will affect your ranking in search engines. Your traffic will decrease. So too will sales. Your business will be in trouble.
Now read this:
If you never vary your sentences, they become monotonous and boring. Your reader will disengage, leave, and never return. That’s not to mention that bounce rates will increase, Google won’t like you, your search engine ranking will drop, traffic will decrease, and sales will decline. Your business will be in trouble.
You probably prefer the second paragraph right?
If you use too many short sentences, it creates a robotic feeling, and your writing sounds choppy. Conversely too many long sentences make writing hard to read. You need a balance.
The Purdue Online Writing Lab shares several strategies for adding variation to your sentences. These strategies include changing sentence length and varying openings.
But it’s not just about flow.
Inject Your Personality
An article on Men With Pens by Ali Luke titled How to Use Language Like a Pro mentions four bloggers, shares an extract from their writing and breaks down their writing styles. The below screenshot highlights the different writing styles and who wrote them:

You don’t resonate with all those styles, right?
Readers read your posts not only for the value they get but also because they like your style. That’s what keeps them coming back for more.
That’s why they’ll read your post over someone else who is offering the same information.
That’s why, for example, I read Bamidele Onibalusi’s blog posts over other bloggers writing about freelance writing.
And that’s why many will read this blog post over others.
But how do you achieve your own unique style? Here’s three ways.
#1 Share a Personal Experience
Whenever I write a post about sharing an experience I get more engagement. Readers enjoy the honesty and, that you’re willing to trust them with a personal experience.
One of the best examples of this is the article by Jon Morrow titled How to Quit Your Job, Move to Paradise and Get Paid to Change the World.
In the post, he inspires people, provokes strong emotion, and makes them feel like they can do anything, simply by sharing HIS story.
#2 Ask your readers questions
People taking surveys on the street will ask you, “Can I have a minute?” or “How are you today?” You either stop or veer away because you feel like you need to come up with an answer. Even if you breeze past them to get home to your supper, you did feel compelled to answer.
A good friend asks questions. When a doctor asks you a question, it’s meant to help you out. Your better teachers did it; the ones who only lectured – unless they were phenomenal at it – bored you out of your mind.
We are hardwired to answer questions. It challenges us. It engages us.
So start including questions in your blog posts to engage your readers. You’ll see I’ve sprinkled them throughout the post:
Here:

Here:
![]()
Here:
![]()
And here:

And in countless other sections of this post. You’ll also notice how I talk to YOU when I write. Speaking of which…
#3 Talk to Your Readers
You need to write like you speak so that people understand. It’s one of the best techniques to improve your marketing content, blog posts and advertising copy. Included in this is the generous sprinkling of the words “you”, “you’re,” and “your” throughout your text.
Write like you’re having a conversation with your reader; it’ll not only spice up your copy but engage them. They’ll feel like your equal because you’re not talking down to them. They’ll trust you and learn to love you!
A great test to see if your copy is easy to understand is the BarStool Test. Direct response copywriter and co-founder of the American Writer’s and Artists Inc, Paul Hollingshead, coined this term. With the test, you ask yourself, “If I were having a beer with someone, would I speak like this?” If not, rewrite and revise until you’re happy.
By now your blog post should be complete. The final thing to do is to optimise it for search engines. I’ll show you how to optimise your posts in WordPress and Yoast. In fact, I’ll show you how I optimised this exact post.
Step 8: How to Optimise Your Blog Posts
What I provide are the basics of what your clients will want for any blog post. I do want to repeat that there’s no correlation between the number of keywords and search engine rankings.
More keywords do not lead to a higher ranking. If anything they result in keyword stuffing, which Google penalises.
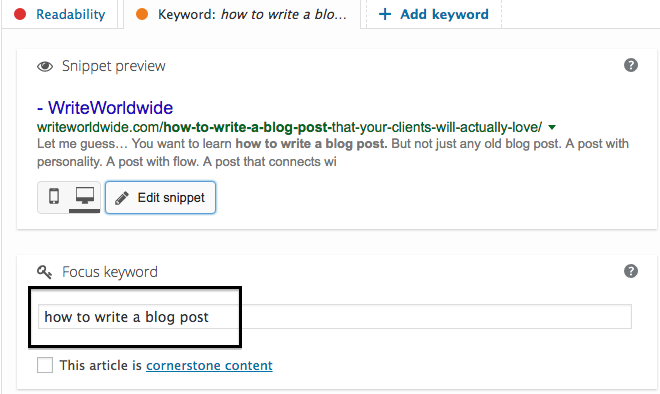
Now, how do you optimize your posts with Yoast?
SEO With Yoast
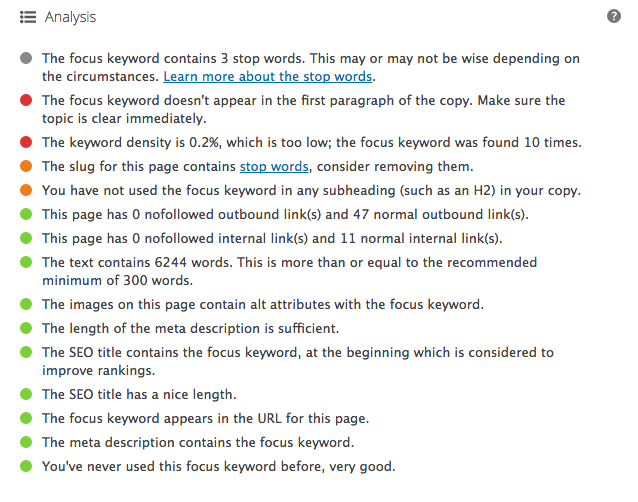
Yoast provides a free and a pro version and I’ll show you what to do with the free version. There’s a checklist that you can find at the bottom of your post in WordPress. Your goal is to get each line item green.
Together with the checklist, you can find the overall SEO status of your post in the top right. As you make changes to individual line items in the checklist, the overall status changes.
Let’s see this in action with this post. Here’s what the checklist currently looks like. Do take note that I have already included internal and external links:

And here’s the overall status which is “Not available” because I haven’t yet specified my keyword.
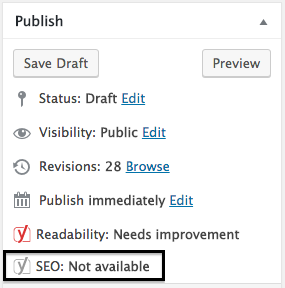
My goal is to achieve a status of “Good” overall. Before I show you how to do that take note that achieving a green light for each checklist items may come at the expense of what feels natural, like your title word placement, or the number of keywords. In those instances, ignore Yoast; rather use it as a guideline for SEO.
You should, though, at very least include your keyword in your meta description, title, alt images, slug, and in the very first few paragraphs of your post. Do that and you’ll still achieve a “Good” SEO score without sacrificing what’s natural.
Step 1: Specify Your Keyword
I specify the keyword “how to write a blog post”.
Step 2: Include The Keyword in Your Title
I make sure that the keyword is in the title of the post. Your SEO title can be different from what readers see on the page but I decided to keep it the same.
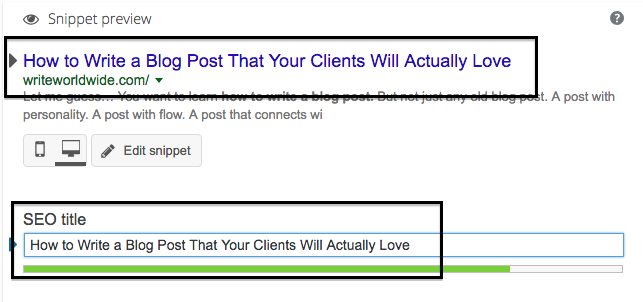
The green bar at the bottom tells me the title is a good length.
Step 3: Include Your Keyword in the Meta Description
Your meta description is the little snippet below a post title that you see in search engines:

The meta description needs to tell readers what the post is about and encourage clicks. Here’s mine:

See my keyword?
Step 4: Include Your Keyword in Alt Tags
The alt tag is the alternative text in your image. Include your keyword in the alternative text of your featured image. Here’s how I did it.
I click on my featured image in WordPress and change the Alt text:

Step 5: Write Your Slug
According to WPBeginner, “The post slug is the user-friendly and URL valid name of a post”. Example below:
![]()
WordPress and Yoast will automatically generate your slug, but it may sometimes be too long, so double check it. Here’s my slug:

Step 6: Add Internal and External links
Internal and external links provide SEO juice. I mentioned that I already included mine, but I double check that the links open in new tabs because there’s nothing more annoying than clicking on a post only to find that it opens on the same page.

You do this by clicking on a link, selecting edit, and ticking the box that reads “Open link in a new tab”.
Here are my final SEO results.
The checklist:
The overall score:
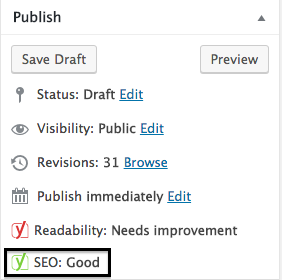
That’s it. I’m happy and hit publish.
Conclusion
Writing a blog post that your clients love doesn’t have to be difficult. In fact, it’s simple. But it does require effort.
You need to take the time to understand your client’s business and the type of content they want. This will help you generate content ideas that hit the mark.
Do keyword research to find your primary keyword. You want long tail keywords, with low competition and high search volumes.
Then research to compile a blog post outline. Find case studies and examples that add real value to your post.
When you’re ready, start writing. But do make sure that you make that process as seamless as possible free of distractions.
If you’re struggling to write content that engages readers, spice it up. Use powerful hooks that dig into readers pain points Use transitional words. Inject your personality into your writing. Ask questions. Share an experience. Talk to them.
Treat your readers as equals, have a conversation and build a connection.
This is what separates your content from someone else’s. And this is what will keep your readers, and in turn, your clients happy.
For the final touches, optimise your posts for search engines. Include your keyword in the title, meta description, and in your alt tags of your images.
Ultimately, you’ll have a blog post that readers resonate with. A post that solves their problems and adds immense value. More importantly, you’ll have a post that your writing clients actually love. What more could you want?
What techniques do you use to write blog posts that your clients love?


Hey Nick,
Your post is amazing as always. I am glad that innocent question led to this highly charged post. I didn’t see this coming, but I am glad I asked the question.
This, to me, is what amounts to delivering value to your readers. Keep teaching and inspiring us. I am certain your efforts will yield great bloggers sooner than later.
Regards.
Hi George,
Thank you! There’s more on the way!
Keep well,
Nick
Just perfect Nick!
I would totally use this as my guide henceforth.
Thanks man
Hi Efose,
Awesome! So happy you found it valuable 🙂
Keep well,
Nick
I am new to writting and this post has really challenged me.I thought I knew how to write good content…turns out H don’t???This was a great eye opener.
Thanks alot for taking your time to educate us.
Hi Christine,
Thank you for the kind words and that you found the post valuable.
Cheers,
Nick
Thanks Nick! You Rock it again, your way. You’re progressing on each of these posts.
Regards,
Hi John,
Thanks for always supporting me 🙂
Cheers,
Nick
Hi Nick
Very helpful post. I am going to relook my posts after reading this. I also love Henneke Duistermaat’s work.
Thank you for an excellent resource. Will bookmark and refer to often.
Hi Poovanesh,
Thank you. So happy you found it valuable 🙂
Cheers,
Nick
So much value in one post. I was skeptic about reading this, but I’m glad I did. The tools you provided especially the headline ones are awesome. Thanks, Nick.
Hi Ibrahim,
Haha. Skeptical? Why?
Happy you found it valuable.
Keep well,
Nick
Hey… Nick
Actually this advice will take my writing ability to another level.
Continue inspiring us, we newbies.
Hi Dennis,
Thank you. I will keep doing what I’m doing 🙂
Cheers,
Nick
Am humbled by your generosity Nick:) For the time you took to put this together for us newbies!
Wanting to return to my love of writing I’ve made a conscious move away from my long career in Finance / Project Management. In that process I stumbled upon many helpful blogs – Bamidele Onabalusi and his $1K challenge in particular- through which I happened on your work as well. Jorden Roper is another distinguished gal – real, tangible pointers there as well.
The PM in me salutes you guys – my career has been about working with teams to bring strategy to reality. That’s what you guys are doing in a much harder field AND showing us all step by step how it’s done. I’m going to do this and have my first client pay me this month!
Appy
Thank you – gratitude and wishing you more success.
Hi Appy,
Thanks so much for the comment. Please, implement the strategies, then share a post about it on WriteWorldwide. There are far too many people who just read, read, read. They procrastinate and make excuses without taking action. And, if they do take action, they put in minimal effort, and give up before they reap the rewards. We want to share more success stories. And, those success stories will validate what we’re doing and give us the motivation to keep going to even further heights.
All the best!
Nick
Comment I must confess that this post is detailed, and self instructive. I was glued to the end. thanks for sharing Nick.
Hi Gideon,
Thanks 🙂 Please use the tips ins your own writing career and share the results with us.
Cheers,
Nick
Hi there i am kavin, its my first time to commenting anywhere, when i read this
paragraph i thought i could also create comment due to
this brilliant article.
Thank you!
I’m not sure where you’re getting your info, but good topic.
I needs to spend some time learning more or understanding more.
Thanks for great info I was looking for this info for my mission.
Glad you enjoyed this, William. All the best in your writing career!
This is a brillant article with some great tips – thank you for sharing.
Thanks Jane, we’re glad you enjoyed it!
Nice post 🙂
Thank you!
Nick
Wow wow wow
This is Dinamite impact post and I’ve already shared it with my girlfriend and younger bro who I am teaching freelance writing. I’m pretty sure that this post will easily grant them direction.
Just like walter says, I’ll use the knowledge gained in immediate action on my brand new Cannabidiolwriter website.
Hi Moriki,
Thanks so much for sharing it.
And please keep us posted on progress. We love to see people succeeding!
Best,